Introduction
I recently upgraded my Bosch GTS10 contractors saw to a more robust machine. The new machine was bought used and is about 20 years old. It was made by the Italian company Veba Meccanica SRL and sold in Sweden by the company Luna with model name KSF30. It has a cast iron table, a small sliding table, a spindle moulder and two nice 2,25kW three-phase induction motors. A few nights of TLC and it was usable. I still need to fix a few things but that is not what this article is about. No, this time I will describe the shop made blade guard I have made for this saw.
The original blade guard was a pretty crappy one made of casted aluminum that was mounted on the riving knife. Not only was it sometimes obstructing the blade, it was also possible to hit the guard so that it was bent into the saw blade because of a pretty flimsy riving knife (which is to be replaced). Last but not least it didn’t have any built-in dust collection. My previous experience is that connecting a shop vac to the blade guard improves the dust collection tremendously.
Requirements
So the drawbacks of the original blade guard in combination with experience from other table saws gave me nice bullet list of requirements:
- Slim design that is not obstructing the blade or hitting the rip fence when ripping thinner workpieces.
- Stand alone guard (not attached to the riving knife). Ceiling mount not an option because I sometimes move around the saw in the workshop.
- Dust collection port that can be used with shop vac. If working with dust collector it is a plus.
- More or less transparent so one can see what and where the blade is hitting.
Even though I like modifying my machines I first started looking at commercial aftermarket blade guards. There are several of them, the more expensive ones looking really promising but with hefty price tags at $400+. I also found cheaper variants such as this at Axminster, probably all made by the same Chinese company, that looked good for the money. Still they all seem to be a little bit clumsy. I really don’t want a guard that interferes with the rip fence more than necessary.
Design
As next step I started looking at what other woodworkers have built for their saws. It became clear that another requirement is that it must be possible to build the guard with the tools in my workshop. If I had owned a MIG or MAG welder I certainly would already be started with my own neat blade guard made of steel and Lexan clear plastic. Unfortunately I only have access to a welder once a week and that is 20 minutes away by car. Not an option.
Searching the web I found a few guards that looked promising but I kept coming back to a design from the magazine Shop Notes #92. Armed with my Google skills I found a badly scanned copy of that specific issue. After reading the article I made up my mind — my blade guard should be a slightly modified version of the Shop Notes guard.
This is what I came up with:
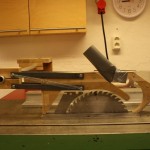
The guard is primary made of solid oak and Lexan clear plastic. The oak pieces were cut from scrap pieces from a table top. I sketched the profile of the blade and riving knife at different blade heights and came up with the shape for the oak in the blade guard. I then just cut the oak pieces freehand on the bandsaw. I then cut some scrap pieces of Lexan, that a friend of mine provided, to the right dimension on the table saw and screwed the whole thing together.
Then I made the block that attaches the guard to the boom. The boom is made from a 25mm diameter (1″) aluminum pipe. The block is split in two and then screwed together again so that it can act as a clamp around the boom pipe. The block and the blade guard are connected using four pieces of steel bar that acts as a linkage that forces the guard to be kept horizontal if lifted upwards. To make this motion a bit smoother a few springs are mounted between the boom block and the guard. I still need to find some better springs though.
The front of the blade guard is cut in 45 degree angle so that any workpiece that is to be cut on the saw forces the guard upwards. I glued a strip of 0,5mm thick galvanized sheet metal to this area to lower the friction against the workpiece.
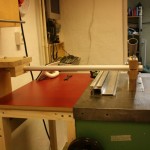
The boom arm mount on the saw is an attempt to get a sturdy mount that doesn’t flex or twist when the boom is pushed backwards (which is what happens when a workpiece is moved against the blade guard). The boom arm is clamped to the saw mount in the same way as the boom block.
Now one would wonder if it works? Oh yes, it does! The upward moment is pretty smooth even though the boom arm could have been a bit sturdier. When hooked up to my shop vac the dust collection is extremely good. With the original guard and the ordinary dust collector hooked up to the base of the saw I got almost no dust collection whatsoever. Adding the shop vac outlet to the guard takes care of all dust. Sweet!
Improvements
Still a few things should be modified or upgraded on the final blade guard. A hole should be drilled in the guard so that a pin can be inserted to hold the guard in upper position during blade switching and such. The springs should be upgraded to a single spring on each side. Also I’m thinking about cutting away some sections of the solid oak in the back of the guard to lower the weight. Finally a new connector for the shop vac should be made from 50mm PP sewer pipe.
A few thoughts about possible upgrades and design decisions:
- If the guard is made a little bit higher, it is possible to raise the boom arm a little bit more from the table which allows for better clearance.
- If the boom block is made so that it protrudes a little bit more toward the blade guard it would provide better side support for the guard. This because the metal linkage bars are tight against the sides of the boom block and the blade guard.
- It is possible to use a larger diameter boom arm and run the dust collection through the arm. On my saw I would have found that a bit clumsy and I don’t have enough space to hook up the shop vac in the end of the boom arm because the saw is close against the wall.
- It should be possible to do a light weight version of the guard by replacing the oak with MDF. If the MDF is cut a little bit undersized a long strip of Lexan could be heated and formed against the MDF. The Lexan strip could then be glued between the two sides and one would get a clear plastic version of the blade guard with hollows instead of massive oak.
Update
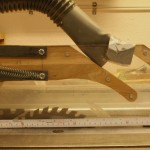
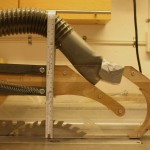
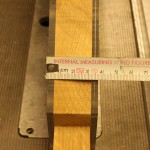
On request from one of the comments below, I have added three pictures including a tape measure to get an idea of the dimensions of the blade guard. Of course it needs to be adjusted to the diameter of the saw blade. Also keep in mind that the blade may move back and forth when the height is adjusted.
Please note that the tape measure scale is metric. The upper scale on the tape is not imperial inches.


Interesting design, I have a table saw with a boom arm as well (Rapid PK-100) but the guard is just too big and unwidely, it’s all cast iron and sheet metal. I am strongly considering making something like that which is thin and transparent. I have a feeling it would make better dust extraction like that too than with a big hood.
Any idea what lexan costs or where I can find it? I’m from Finland so any help would be applicable to me. I’m a swedish speaker too but I am keeping it english since the blog is in english.
I have got a lot of scrap pieces from a local sign-making company. Make sure to get polycarbonate (Lexan/Makrolon/etc) to avoid shattering in case of an accident. I know my local glazier sells polycarbonate.
Thanks for the reply. I have another question, is there a reason you don’t hook up your ordinary dust collector to both the base and overhead guard but instead use the shop vac for the guard and the DC for the base?
The reason is that I don’t have good experience using the DC as a shop vac. They are fundamentally different in design regarding air volume, air speed etc.
Nowadays I have one heck of a cyclone based DC so it may be that it would work out fine. That reminds me of the bad conscious about not having committed any new work to this site. I have done a _lot_ of things that I would like to share.
Yes a shop vac is high suction, lower volume, but a DC is high volume, less suction if I remember correctly. The current port is perhaps too small to work properly with a DC?
I am building a cyclone separator at the moment (bought one from aliexpress), trying to turn an ordinary surplus house vacuum into a shop vac, all I have now is an open slot in the base that dumps saw dust on the floor which I sweep up with a broom now and then.
In the long run I plan to hook up the separator to a proper DC when I can afford one, or find some cheap parts to make my own DC. Then hook up to both the guard and base to the same DC, so I was thinking maybe it was a bad idea when you didn’t do it like that.
My experience is that dust extraction in the blade guard is more efficient than extracting from the base. Both is necessary but when I had a Bosch contractors saw, the addition of extraction in the blade guard vastly improved the dust collection. It was way beyond anything I got working by extracting the dust downwards through the base.
Long time since I wrote about this but I never found any good lexan and then other things happened so it got pushed forward.
One of the things I’ve realized in the meanwhile is that maybe this design, while narrow and slim which is what I want, is maybe not optimal for a DC? Seems the design makes it hard to get a wide 100-150mm DC hose to go anywhere on that. Making me thing it’s more meant for a shop vac with it’s higher suction.
I see you also wrote that you use a shop vac with this.
Yes, I use a shop vac with this blade guard. Until my recent dust collector upgrade, my DC was way too weak to manage to capture the dust from the blade. Thus, the shop vac heavily improved the dust collection on the table saw.
Thanks for your comment. Unfortunately comments always reminds me that I should spend some time writing new material. I have many things that I’d like to show…
HI:
I would like to receive some measurments on the dust free table saw blade cover. Thanking you in advance for your concern in this matter Bruce
Hi Bruce,
Sorry for the late reply. I added a few pictures of the blade guard and a tape ruler. I hope that will give you an idea of the dimensions.